![]()
| RCFAQ.com |
The complete radio control model airplane FAQ. |
![]()
Zagi 400 & FMA Razor 400
Speed 400 Foamie Flying Wings
Here's a link to a fun Zagi mod. The author put a rocket engine on his slope soaring Zagi to get it up to altitude.
This page definitely isn't finished. Here's a start, though, with most of the information and FAQ's provided by Ken Cashion.
-----------------------------------------------
I'm not impressed with the appearance using the
packing tape covering.
They all do not have to look like a reject from the shipping department
but almost any model that was born on the slopes look like they expect them
to fly into walls.
Cheers -- Ken
--------------------------------------------------------------
This is a compilation of a bunch of e-posts on Zagi and the FMA Razor. I
have also attached a jpg of my Zagi and Razor so you can see that not all Zagi's
need to look like a reject from the shipping department.
Cheers -- Ken Cashion
Getting back into RC flying - looking at something cheap and lots of fun, so the
Zagi and/or the Razor comes to mind.
You mentioned that you had a jpg of these planes -- can I take a look?
I have sent you one of my Zagi and Razor and can send more if you would like.
I have amended to this e-mail a long bunch of correspondence about these
models.
Try sorting in Alta Vista on Zagi 400.
What radio do you recommend?
Any three channel will do fine and I always recommend that the little $20
WattAge mixer be used between receiver and servos. Hobby People have
these. I have a computer radio and would rather use these with regular
radios. I have three of these mixers.
Cheers -- Ken Cashion
I've got a few questions and was wondering if you might be able to
help me out... I just received my Zagi in the mail, I actually bought it
from a guy on RCOnline, (he had bought 2 and realized he didn't need the
2nd) anyway... when I opened the box I found 2 semi-shaped pieces of white
foam... there was no airfoil shape to the wing what-so-ever... I know this
is a kit and all, but I was under the impression that the wing was shaped at
least... I don't have enough time to learn how to cut foam to get the
desired result... can you give me any pointers here??
Thanks,
Mike Smith
-----Original Message-----
From: Ken Cashion
Subject: Re: Santa Fe Zagi... :)
At 11:10 AM 8/14/00 -0500, you wrote:
I'd love to see your Zagi if you've got pictures readily available...
I have attached a couple of jpgs of my Santa Fe Zagi and I have
attached a
lot of correspondence about the Zagi and Razor -- some of which might be of
some use to you.
... are the instructions that hard to follow??
No, they are easy to follow -- there just isn't enough of them!
What follows are pieces of other e-mails --
I think
I've settled down after throwing out that completely backwards logic on
preventing tip-stalling.
Even the full-size aircraft, the Vari-eaze, has a break in the
airfoil
about five feet from each tip and the tip and center parts of the wings
have two different airfoils, the ones at the tip being able to develop more
lift at higher angles of attack. This is actually better than washout
because washout is the same airfoil throughout but with the tips
effectively twisted with the trailing edges up.
This means that at the normal angle of attack for the center
section, the
outer tips are developing little (or no) lift compared with the rest of the
wing.
This is how most modelers do it but it isn't necessary. Some of the
exotic wings have one airfoil at the root and another at the tip and the
change is gradual down the wing.
There are a lot of different ways of doing it and the Razor way is
pretty
good.
When I start cutting foam for the first time later this year, I am
going
to work with very low aspect ratios for several reasons, but I know that
these will be different from what I am used to.
I will use auto vinyl trim tape on the top front of the leading
edges for
turbulators and help prevent stalls.
How will I know where to put them?
Easy.
I will put them on...say the right wing only and see which wing
stalls
first. If it stalls right and left equally, then the turbulators aren't
doing any good and I will peal them off and put new ones on different
places. Eventually, I should have the unturbulated wing stalling
first --
then I will know I have them positioned correctly and I will duplicate the
tape placement on the other wing.
I'll also try
to clean up the trailing edges of the wing as you suggested. Would you
recommend epoxy or CA for attaching the balsa?
For this strip, there is no reason to have the weight and gunk of
epoxy
and remember, you will have to trim the top and bottom and triming epoxy
away from foam is a devil of a job -- so use thick CyA and be done with it
in 10 minutes max.
The only other questions I have right now have to do with covering. What's
the scoop there?
Most guys put the silly shipping tape on it but this is because
Trick
developed these models on the slopes and the slopes do not have a lot of
nice places to land so the model has to be rugged and no one takes pride in
their model.
The instructions say nothing (with the exception of the
few pieces of the lexan tape or whatever they called it.
I have put some long texts on this e-mail about the Zagi, Razor, and
Teddy. You should be able to tell which are my comments and which are
other guys'.
I got the gray wing model using
the logic that white and clouds don't mix, nor does a blue wing and blue
sky.
But bright trims make them show up real well.
I'm thinking of covering the elervons and winglets (I think those are
the right names, the wood pieces anyway) with iron on covering and painting
some stripes or something on the wing to make it stand out a little bit.
Sounds fine with me. But as always, test the paint on a piece of
foam first. A styrofoam drinking cup is always handy.
Three Zagis on a flat field with a fair amount of wind. Two
have been trimmed and are flown by good pilots. Third one is ready
for first flight.
CG, throws, and neutrals on new Zagi meets the approval of
experienced Zagi pilots.
One of them gives my new Zagi a toss -- I couldn't trust
myself to throw it considering the strange way it must be held.
Wow!! Four seconds into flight, I am doing axial rolls.
Back on ground, I made a little adjustment and flew it the
rest of the afternoon in more wind.
It will not do tight outside loops and its inverted flight is
not too good, but all else is great fun.
We had all three up at one time and if I had been trying to
hit my friend's Zagi, I would have missed him -- as it was, I flew
into him and knocked his battery from his model.
I kept flying.
Neither of us could find any mark on either model and the
three of us never found his battery pack.
Then it was time to test the FMA Razor.
I launched -- Whoa! Too much up and too much right turn!
Back on the ground, I adjusted the settings and friend
suggested moving the CG forward a little, which I did with a little piece
of lead 3/32"x1/2"x3/4".
The next flight was better but I did not have the air-speed I
felt I should and roll-rate (compaired to Zagi) was plum sluggish. It does
have a little more drag than the Zagi but I like the extra room in the
Razor and the ease of launching.
However, Razor outside loops are pretty and round and it will fly
all day inverted with only a moderate amount of "up."
I removed the motor prop adapter and little Master Airscrew
that came with the kit and pushed on one of the funny-looking little
white props that come with the Zagi.
Now that was more like it! Air-speed came up (I know why) and
manuevers were sharper.
I have since decided that after removing the chunk of aluminum that
makes
up the prop hub, I could most likely take the little piece of lead out of
it, reducing the overall weight.
For a beginner, I would recommend a Razor over the Zagi, and I
would not even install the MA prop on the Razor.
And the Razor, with a little fuselage, is easier to launch.
The Razor instructions are very, very good; the Zagi instructions
are
poorly written and incomplete.
And I forgot an important point about the Razor -- on both models, I
trimmed the trailing edges slightly and glued a balsa strip to reinforce
that area -- with the Razor, I used thick CyA and accellerator -- that foam
will take the CyA.
Because I use a 4x3 cell pack, I left the Zagi equipment cover a
little
higher to clear these batteries. This also gets the batteries a little
farther forward than a flat pack, but still I had to add 1.5 oz. of lead to
balance.
I used micro servos just because that is what I had, mini's would
work as
well and not significantly weaken the wing and perhaps eliminate the need
for lead in the nose.
Cheers -- Ken
In both cases, I added a little strip of balsa at the trailing edges
and
gave it all a light sanding and then with a light spackling and my finger,
I rubbed it into the foam. The spackling was sanded off and then the Zagi
got the 3M spray and reinforced packing tape.
I gave the Zagi another light coat of 3M and then covered it with
Ultracote with an iron set at about 200 degrees. This was hot enough to
soften the adhesive on the film and get a good bond with the 3M.
It also got the film to shrink enough to get a good finish. You can
see
the tape under the film but this still looks better than the silly adhesive
tape that comes with the model.
I used neon pink and yellow strips across the wing of the Zagi to
tell up
from down. I covered the fins with sky-sheen reflectance film and squared
off the tips, epoxied 1/16" balsa to the tips, shaped them the same as the
wing and then put the fins on with real contact cement -- not the spray
stuff. This is holding real well -- again, I did not use tape to hold the
fins on -- that is not the way I build models.
The rest was pretty much as the plans indicated -- when they did.
The Razor looks so German that I used acrylic paint thinned with
water and
the bottom of the wing is sky blue and the top is a two-tone spinach and
olive green camo like they used in WWII.
I drew panels on the Razor with a pen, then put swasticas on the
outside
of the fins and big crosses above and under the wings.
I painted the instrument cover front with silver paint to give it a
canopy
and added some other details to make it look more exotic.
It looks like one of those German secret weapons at the end of the
war.
The instrument cover of the Zagi is plain junky and ugly and looks
like
the whole model is covered with tape because no one is going to care the
way it looks.
The Razor is a better model.
The
plane is for a beginner (me!) and I want to know if the FMA can take some
punishment.
The Razor will take plenty of abuse. I have some clear tape on the
bottom
to keep the bottom fuselage from getting gouged up in landing -- the Zagi
doesn't have a fuselage and just slides on the wings.
The Zagi might be the better flier but I don't think so right now.
Did you ever find a way to increase the roll rate of the FMA?
With the little mixer and non-computer radio, I need to increase the
gain
of the aileron throw and I will then have a higher roll rate. You cannot
just move the control horn/push-rod position because that would increase
the throw of the elevator, as well, and it has plenty now.
Do you think
the speed difference could have been due to the extra weight you needed to
balance out the FMA?
No, I think it might be the drag of the fuselage. The Razor has
about 3
sq. inch more frontal area than the Zagi.
I still recommend the Razor over the Zagi for a near-beginner --
just
order the little props from Hobby Shack -- they are a couple for $5, I
believe.
Cheers -- Ken
Tom, while I was half-awake this morning something occurred to me.
The Razor does not come with the plastic beds from which it was cut
because it is a molded model.
The two halves of the Zagi (a cut model) are put together in the
beds on a
flat surface, whereas, the Razor is put together "in the air," as it
were.
It is necessary to remove just the sheen from the edges of the Razor
where
it is to be epoxied to make sure that the die-parting agent is removed --
otherwise the epoxy would not stick.
After I got through holding my halves together and having the epoxy
harden
enough to support its own weight, I let go of it and sighted down the wing.
I believe the leading edges should be a straightline and I am not
convinced that mine are. I thought that they could have a little droop to
them, or instead of being straight or having dihedral, they have a minute
amount of anhedral.
I will measure them very carefully when I go to the shop again. If
it
does, I shall pull the clear plastic "anti-gouge" tape from the
bottom, cut
about half way through the fuselage beside the epoxy seam and epoxy a
little strip of balsa (maybe 3/32") in the crack. This will be easy
to do
and I might put a little strip of spruce on top of that for a better skid.
What makes me think that it might have a little anhedral?
Well, I expected it to fly a lot like the Zagi -- but it flies
inverted
better and does nicer outside loops. This sounds like a model with a
little anhedral.
The inside loops are not as tight as the Zagi and the anhedral would
affect roll-rate. A few times in a loop, as it got inverted, if it slowed
down, it would roll out of it, rather than fall through the top of it.
So I have all these explanations for a condition I do not know
exists --
the point is, when putting the halves together, it might be possible to
alter the molded dihedral/anhedral or whatever it is designed for.
I would suggest that you do some measuring and block up the tips
when you
put your Razor halves together.
The anhedral would explain snappy pitch control and mediocre roll.
Think about it.
Cheers -- Ken
Hmm.. this is interesting, as I was assuming that the RTF kit was just
that.. basically add the electronics and go..
I didn't want to have to fiddle with this type of thing.
I later made measurements of the dihedral and the bottom of the wings were
flat which makes the top surfaces point down some and this is enough
anhedral to cause my problem. I didn't want to cut it apart so I blocked
up the wings with the belly a little of the work bench and then stacked
weights on the top to make the fuselage sag to the worksurface.
I left it three days and when I lifted the weight, the fuselage stayed on
the worksurface.
I went out to test fly it and now it had equal inside and outside loops,
still few on its back just fine, but was not so twitchy in level flight.
Seven months later, it was flying funny again. It took me a few flights
to convince myself it was doing "it" again. I repeated the
weighted center
with wings blocked up and it was back flying good again.
I will pay more attention and correct it again before it scares me.
I think the leading edge should be exactly straight or the top surface of
the wings in a straight line -- certainly the bottom surface should NOT be
straight!
No, both models need to be assembled from about six, already-cut
pieces.
I have never understood this RTF thing anyway. I think it means that you
do not have to build wings and fuselages or something.
Thanks for the tips though, I will be very careful when joining the two
halves! Hopefully this accounts for the differences in performance between
the two planes. I am definitely going to order up some Zagi type props,
and
won't bother with the stock FMA, as you indicated.
Tom, the white plastic prop are a couple for $5 and I know that what
FMA
puts in the box would cost about $12 if I bought the hub and prop via a
discount mail order house. I am surprised that they don't include the
white prop.
Cheers -- Ken
How did your zagi balance out -
A flat piece of lead imbedded under the instrument tray into the
foam
leading edge -- about 1-1/2 oz. I use the square pack batteries -- four
parallel with three on top of the four. I did not cut the plastic cover
where they indicated but where it would just fit this square-ish pack.
This battery pack puts the battery weight well-forward of a flat pack.
I had to add a good 3 oz to the nose area.
This seems about right I guess with strapping tape and long battery.
My
two friends built theirs with shipping tape but they are flying on eight
cells and this helps balance it -- I rarely fly with more than seven cells
and some of mine, I fly with six.
it's all done, batteries are charging, looking forward to tommorow
afternoon:)
It sure is ugly, hehe
They do not all have to look like they've been sent through the
shipping
department.;-)
I used light spackle with a little food coloring in it so I could
make
sure I was getting all the Zagi covered, then sanded most all of it away,
sprayed with 3-M, applied tape for stiffening, then I put ultracote over it
with the iron at 200 degrees F. This softens the film and 3-M and shrinks
the wrinkles.
The L.E.S. logo and Zagi 400, I did with my ink-jet printer using
various
techniques depending if I want a flat finish or gloss or what. I wanted
gloss on the Zagi, of course, since the covering was glossy.
The front of the thing looked like a locomotive and I had a Sante Fe
locomotive about three inches long, so I scanned all the views, and printed
it to full-sheet mailing label stock. The edges don't match but that is
OK.
Cheers -- Ken Cashion
My
Experience...this is a neat plane, but experienced advice
will save you money!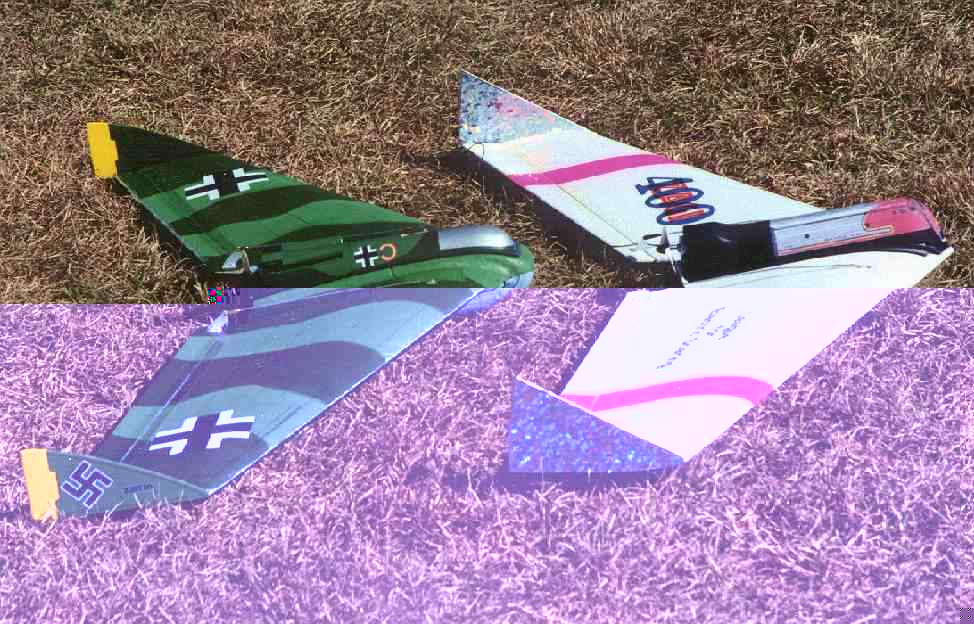
My
Battery notes (the rec. 6 cells are poor)
My ESC notes (some just don't work)
![]()
Battery
Notes
6 cells
![]()
ESC's...
Finding a
![]()
Receivers for your Lite Stick
![]()
LINKS
![]()
All of the information on
this web site is copyright 2000 by rcfaq.com. All rights reserved.
Revised: October 05, 2001 .
email webmaster@rcfaq.com